Ganache Darn It!

Ganache Darn It!

Saturday, December 31, 2011

Sky Juice and a Happy New Year!

I've been thinking of my dear friend Marie a lot this holiday and as an ode to her, I'm making Sky Juice martinis for New Years Eve. They are delicious, coconut-y, and remind me of the amazing holidays I've had visiting my Bahamian bestie. One can make them as a mixed drink over ice, or shaken and served in a martini glass.


What you'll need:
One part gin
Three parts coconut water
Heaping teaspoon of sweetened condensed milk (leftover from those pumpkin pies you intended to make)
Ice

Shake or stir these ingredients over ice and imbibe! Happy 2012, everyone!


Don't mind the potatoes and asparagus in the background, New Years dinner of steak and pommes frites is about to go underway.

Tuesday, November 22, 2011

Torta Caprese

You know those absolutely delicious meals or dishes that haunt you forever? This is one of them. The day after my fiancĂ© and I were engaged, we shared this amazing dinner in Riomaggiore, Italy. I’ll spare you the details of the sunset and the crying and the long hike along the coast. But, the details of this cake will not be spared. It was warm and gooey and had a light crunch on the outside, with a dusting of powdered sugar and a drizzle of chocolate sauce. It was heaven. Six months have passed since our trip and I have not forgotten about the cake. Through some internet stalking, I managed to find out that the owners of the restaurant, Il Grottino, are actually Sicilian. This tidbit sent me on the path for Sicilian chocolate recipes. Rummaging through the Google images, I found it: the Torta Caprese! This was the cake I needed to make. Kathy, over at Food Lover's Odyssey, recreates foods she has had in Italy and France, and I have stolen this recipe from her. It is spot on. Not only is this the most delicious cake in the world, it is naturally gluten free! This means it’s healthy, right?

Ingredients:
9 ounces good quality dark chocolate, chopped into small pieces (Cadbury Special Dark, mmmmm)
1 cup butter
¼ cup cocoa powder
1 tablespoon almond extract
1 ¼ cup granulated sugar
1 ½ cups ground blanched and toasted almonds (I use Bob’s Red Mill Almond Flour. It’s a great product that makes perfect macaroons, as well, and can be found in almost any grocery store)
6 eggs, room temperature

Directions:
Preheat an oven to 310°F (that isn’t a typo, your oven really does go to that temperature) and line the bottom of a 9-inch spring form pan with parchment paper. I gave the sides of the pan a good covering of nonstick spray, because I’m paranoid about cakes sticking to pans.
Slowly melt the chocolate and butter over a double-boiler. What’s a double boiler you ask? Fill a small pot with water about half way and bring to a boil. Place a glass bowl on top and let the heat from the water gently melt the chocolate and butter together. I chopped the butter into one tablespoon pats and mixed with the chopped chocolate. Don’t be too tempted to just drink this rich liquid you’ve created now, it will be better once baked into a cake.
In a stand mixer with a whisk attachment, whisk together the melted chocolate mixture, the cocoa powder, almond extract and sugar until combined. Add the ground almonds and whisk until combined. Add the eggs one at a time, adding each egg after the first has been incorporated into the mixture. I like to crack my room temperature eggs all into one bowl, that way they’re easier to plop into the mixer, one at a time. 


Pour the mixture into the spring form pan. Make sure the mixture is level and smooth on top, drop it on the counter or floor a few times, and poke the bubbles with your finger or a toothpick. Bake for 60 minutes and be sure to let cool before serving, so it can set. I topped mine with a heart stencil and dusted it with powdered sugar. This cake is rich and will live in your dreams for years to come. Your gluten-free and gluten-full friends will thank you, propose marriage, and offer other various acts to you for making this cake.


Friday, August 12, 2011

Kale Chips

Since we can't have cake for every meal, we must have recipes with vitamin-packed deliciousness on hand.  These are extremely simple and delicious chips made from a vegetable that is in season year-round, did you know that this hearty green can be grown well into the colder seasons in Minnesota? These crunch and immediately melt in your mouth, similar to pork rinds, but with far less pig skin.
All you need:
1 large bunch of kale
1 tablespoon of olive oil
Salt
Pepper
Preheat your oven to 350 degrees.  Tear your kale into pieces about the size of large tortilla chips.  Toss with olive oil, pinch of salt and pepper.  I used two sheet trays since you don't want to overcrowd your chips, we want them crispy, not steamed. Giving each chip room, spread out on your pan.  Once your oven is ready to go, pop both pans in and set your timer for 10 minutes.  Check your chips at this point, if they still look a bit floppy, give them another minute or two.  I found that the magic time for my oven was 13 minutes. I was extremely pleased with how they came out and made them three days in a row.  Even the meat-loving fiance devoured the thin, crispy, and healthy treats.  If you don't think turning a green into a crunchy snack is possible, you must try making kale chips.


Wednesday, August 3, 2011

Cantaloupe Sorbet (Sorbetto al Melone if you're fancy)

I had a group of amazing ladies coming over and wanted something refreshing and light for dessert. I always try to use whatever might be sitting around the house and on the counter at the moment was a large and extremely ripe cantaloupe.  Since my melon was so big (insert boob or head joke here) I ended up doubling this recipe. In the future, I think I will use half the amount of sugar the recipe calls for.  Melons are so sweet and juicy on their own, I know it will be just as delicious with mostly its own sweetness shining through.  If someone tries it before I get around to it, let me know!  This really was pretty easy, you just have to have time to freeze it and whip it with your mixer and then refreeze.  If you have an ice cream machine, I imagine this would come out like a smooth melon dream. This comes from Bon Appetit Magazine, so you know they know what's up.
Ingredients
2/3 cup sugar
1/2 cup water
3 cups 1-inch pieces peeled seeded cantaloupe (about 1/2 cantaloupe)
Preparation
Combine sugar and water in medium saucepan. Stir over medium heat until sugar dissolves. Bring to boil. Transfer to 11x7x2-inch glass dish and chill until cold, about 2 hours. I did this by sticking it in the freezer to speed along the process, I'm an impatient lady.
Puree cantaloupe in blender until smooth, use some of your sugar syrup for lubrication if it needs help getting smooth. Combine with the rest of your sugar syrup in dish and stir until well blended (I did this in my KitchenAid mixer and then poured back into the dish). Freeze until almost firm, stirring occasionally, at least 3 hours or overnight.
Transfer cantaloupe mixture to large bowl. Using electric mixer, beat until fluffy. I ended up wrapping the mixing bowl in a towel soaked in hot water so it would help warm things just slightly, making it easier to whip.
Return to freezer and freeze until firm (do not stir), at least 3 hours or overnight, storing in an air-tight container. You can prepare this three days in advance. Now your melons will never go to waste again!

Wednesday, July 27, 2011

Flan (Custard's MUCH Sexier Cousin)

This recipe comes from my friend Genevieve, who is an amazing cook. It's actually her grandmother's recipe and the real deal! Whenever I go to a function of Genevieve's, I cross my fingers that this flan will be there.  I thought the recipe would never be released into my hands, that it was closely guarded by someone or something like the Bush's baked bean dog, but classier.  Genevieve has been baking this flan for years without having written down the recipe.  So here it is, for all to enjoy.  It is not the easiest thing to make, but is by far one of my favorite desserts.  Be sure to bring all ingredients to room temperature before you start, this is very important so don't skip it.
Ingredients
8 eggs
1 can sweetened condensed milk
1 can evaporated milk
1 cup regular milk (whatever you have in the fridge, but don't even try soy, I've ruined some things by using soy milk)
6 tablespoons of water (in a bowl, ready to go)
4 cups sugar (2 for the caramel and one for the custard)
3 tablespoons vanilla extract
1/2 teaspoon salt
2-3 tablespoons guava paste (optional)

Preheat your oven to 350
First you must make the caramel that once all is done, will be dripping down the sides of your flan, lickably good at the bottom of the dish. If you have absolutely no idea how to do this, don’t worry, it’s just sugar and you can always start over! This is something you must babysit until it is complete.  Put two cups of sugar in a nonstick pan.  I set the timer to see how long it took and it was between 10-15 minutes.  It will start by just getting clumpy and then turning into slightly golden pebbles, see-
The sugar will continue to melt, stir with your wooden spoon until it’s liquid, brown and bubbly. Remove from heat and carefully add your six tablespoons of water. Stand back, you don’t want this stuff to splash on your arm! Stir immediately and mash in your guava paste, the guava paste is optional but gives the flan a tangy, fruity flavor that makes your guests ask, “what is in this that makes it so good?” Stir this mixture until it is calm and immediately pour into the dish of your choosing.

I used a large soufflĂ©, you could use a glass 7” x 11” casserole, or individual crème brulee dishes.  Set this aside.
It gets easier from here! Stir your three milks together until the sweetened condensed milk isn’t sitting at the bottom and they’re incorporated into one thick milk mixture. Whisk 8 eggs together and add 2 cups of sugar.  Whisk milk mixture slowly into the eggs and sugar, add vanilla and salt.  Gently pour this through a sieve to remove any sugar or egg lumps (nobody likes a lumpy flan).  
Transfer this to the pan with the caramel and you’re ready to bake.  Use a water bath or Bano de Maria.   You do this by placing your baking dish in a larger dish and filling it up about an inch with boiling water.  Bake for one hour or slightly more or less depending on the dish you use.
I used a seriously deep dish, so I went for an hour and 20 minutes.  Don’t overcook, it should be extremely wobbly when you take it out, but not liquid.  I let it cool on the counter for a just a bit before placing in the refrigerator.  You MUST refrigerate for at least 3 hours or up to two days before serving.  Remove from fridge an hour before serving.  Run a knife around the edges and flip upside-down onto your favorite platter (place platter face-down over dish containing the flan and then flip). If all the caramel doesn’t come out, set your burner on medium-low and place your glass dish right on top.   I liked spooning a serious amount of caramel onto each plate. Enjoy with coffee and good friends. Thanks, Genevieve!


Tuesday, July 26, 2011

Ancho Pork, Kabocha and Hominy Stew

This recipe turned out even better than I could have imagined. I took the base of it from Cooking Light magazine and turned it up a bit while keeping things healthy. It's that good kind of spicy that makes your nose run and your belly warm. If you run into trouble finding a kabocha squash, sweet potatoes would be a great substitute. Try your local Asian market before you give up. While I might have recommend this for a cold day, I will admit that we enjoyed this on an insanely hot Minnesota summer evening. Make this stew!

Ingredients
2 tablespoons ancho chile powder
2 teaspoons dried oregano
1 1/2 teaspoons smoked paprika
1 teaspoon salt
1 1/2 pounds pork tenderloin, fat trimmed off and cut into 1/2 inch pieces
1 tablespoon olive oil
2 cups chopped onion
1 1/2 cups chopped green bell pepper
1 tablespoon minced garlic
4 cups (one carton) of fat-free, low-sodium chicken broth
1 large can of hominy (28 oz)
1 (14.5 oz) can fire-roasted diced tomatoes, don't drain them!
3 cups chopped kabocha squash
Preparation
Combine first 5 ingredients in a large bowl; set 1 1/2 teaspoons spice mixture aside. Add pork to remaining spice mixture in bowl, tossing well to coat.

Heat 2 teaspoons oil in a large Dutch oven over medium-high heat. Add pork mixture to pan; cook 5 minutes or until browned, stirring occasionally. Remove pork from pan and set aside. You will automatically be in love with this dish at this point because it makes your kitchen smell like Chipotle, not the spice, but the restaurant with giant burritos. Ooooh yeah!
Add remaining 1 teaspoon of oil to pan. Add onion, bell pepper, and garlic; saute 5 minutes or until tender, stirring occasionally. Return pork to pan. Toss in your reserved 1 1/2 teaspoons spice mixture, broth, kabocha, and tomatoes; bring to a boil. Partially cover, reduce heat, and simmer 25 minutes. I recommend throwing in the hominy in the last few minutes of cooking so it retains its shape and keeps from turning into mush. When it was time to serve, I remembered the cilantro growing in the back yard, so I snipped a bit and sprinkled in each bowl.
 
You can enjoy this stew right away, but I found that as a day or even two passed, the flavor got more intensely delicious.  This is a recipe I will keep in my back pocket to use over and over again!

Wednesday, June 29, 2011

Fu$%(ng Croque Madame Casserole


I have to give Paula Deen credit for this one, this woman knows what she's doing and I love her (even with all of the diabetes and butter). You know that question, "if you could have dinner with anyone in the world (let's say in the culinary world) who would you choose?"  I would certainly choose Paula Deen, my mother and Julia Child.  There would be red wine, mint juleps, things covered in chocolate and rich sauces, and everyone would pee themselves from laughter, but I digress.  I was going to brunch at my mother's house and I made this Croque Madame Casserole, it is absolutely delicious.

What you'll need:
6 tablespoons (1 stick) butter, plus 2 tablespoons for eggs (I DID tell you I got this from Paula Deen)
1/4 cup all-purpose flour
2 cups milk
2 tablespoons Dijon mustard
3/4 teaspoon salt, plus more for seasoning
1/2 teaspoon pepper, plus more for seasoning
1/2 teaspoon freshly grated nutmeg
10 to 12 slices white bread (I used a large loaf of French bread)
3/4 pound deli ham
1 1/2 cups (6 ounces) grated Gruyere, reserve some for top of casserole
6 eggs (I skipped this part, but will include it in the directions)

Now get crackin':
Preheat the oven to 400 degrees F and grease your 8-inch square baking dish.
Melt 6 tablespoons of butter in a large skillet over low heat until bubbling. Whisk in the flour and cook for 1 minute. Slowly whisk in the milk and cook until thick and bubbling, 3 to 5 minutes more, be patient with this, don't turn the heat up and burn it and don't under-cook it, nobody wants a chunk of raw flour in their casserole. Whisk in the mustard, salt, pepper, and nutmeg.

 Pour a thin layer of the sauce into the prepared baking dish and cover it with 5 or 6 slices of the bread, then slices of the ham and an even layer of the Gruyere. Repeat the layers once more, ending with a third layer of sauce to cover all. Bake the casserole for 30 minutes. Remove it from the oven and cut into 6 equal pieces.

Working in 2 batches, melt 1 tablespoon of butter in a large skillet over medium-high heat. Crack 3 eggs into the skillet and season with salt and pepper, to taste. Cook until the whites are nearly set, about 3 minutes. Carefully flip the eggs and continue cooking until the whites are completely set, about 1 minute more.
Repeat with the remaining 3 eggs and 1 tablespoon butter. Top each slice of casserole with a fried egg.  I skipped this final step because I know I'd show up to my mom's and there would be eight other things to eat, which there was. It was perfect without the eggs, but I image it would be heavenly after slicing through a runny egg yolk.  This is a casserole that will please even your fanciest of brunch crowds.


Toasted Coconut Chocolate Chip Cookies


I am currently obsessed with all that is coconut.  I'm always looking for ways to sneak it into whatever sweets I can, although I'm completely aware that not everyone is as jazzed about it as I am, but I certainly don't care.  These cookies had the perfect coconut texture and flavor. They also combined two of my favorite things, chocolate and coconut, a combination only second to peanut butter and chocolate.

Ingredients:
1 cup sweetened coconut flakes 
2 1/4 cups all-purpose flour 
1 teaspoon baking soda 
1 teaspoon salt 
1 cup (2 sticks) butter, softened 
3/4 cup granulated sugar 
3/4 cup packed brown sugar 
1 teaspoon almond extract (I was in the mood for it, feel free to use vanilla)
2 large eggs
2 cups mini chocolate chips

First step, toasting your coconut.  Preheat the oven to 350 degrees and spread the coconut evenly over an ungreased baking sheet.  Bake for 15 minutes, stirring every 5 minutes.  If you like yours a little more or a little less brown, adjust to your pleasure.  Set coconut aside and make the cookie dough.

Bump your oven up to 375. Combine flour, baking soda and salt in a bowl. Beat butter, granulated sugar, brown sugar and almond extract in large mixer bowl until it's nice and smooth. An important note about softening butter for cookies, NEVER completely melt your butter, completely melted butter will make your cookies flat, simply soften it. Add eggs, one at a time, beating well after each addition. Gradually beat in flour mixture. Turn off your beater and add mini chocolate chips and 3/4-1 cup of the toasted coconut. Drop by rounded tablespoon onto ungreased baking sheets, I use one of those fancy spring-loaded scoopers and it makes the cookies turn out grocery store uniformed.

Bake for 9 to 11 minutes or until golden brown. I like my cookies soft, so I kept it around 10 minutes. Cool on baking sheets for 2 minutes and place on wire racks to cool completely.  Pour yourself a large glass of milk (I went for the new So Delicious coconut milk) and enjoy, your fiance might laugh at you while you "mmmmmm," from the room next door.

Friday, April 1, 2011

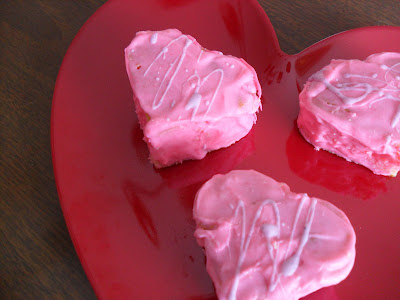
Be My Valentine Cakes

Little Debbie snack cakes are one of my favorite guilty pleasures.  At Christmas time they come in the shapes of trees and around Valentines Day they're even better with their thick coating of waxy pink and white chocolate somethingorother that you can feel forming a blanket on the roof of your mouth, this is what ottomans in heaven are made from.  We were having some people over and I wondered, "could I recreate this adorable snack cake?"  I started with a simple yellow cake recipe, an imitation Twinkie filling recipe, a package of almond bark and some Wilton's food coloring.
Since I had never done a yellow cake from scratch before, I went to a reliable source. Deb, over at Smitten Kitchen, has arguably to the most beautiful cooking blog you'll find http://smittenkitchen.com/.  I used her recipe for "Best Yellow Layer Cake."

She called for two 9-inch round cake pans, but since I wanted to sandwich two slices of thin cake, I used three pans.  She notes that this will yield two 9-inch round, 2-inch tall cake layers, and, in theory, 22 to 24 cupcakes, two 8-inch squares or a 9×13 single-layer cake.  I only have experience with the three pan method, but I'm sure all of the above will work based on your cake needs.

What kind of stuff you need to make the darn cake:
4 cups plus 2 tablespoons cake flour (not self-rising)
2 teaspoons baking powder
1 1/2 teaspoons baking soda
1 teaspoon salt
2 sticks (1 cup) unsalted butter, softened
2 cups sugar
2 teaspoons pure vanilla extract
4 large eggs, at room temperature
2 cups buttermilk, well-shaken
1 heart cookie cutter

Preheat oven to 350°F. Butter three 9-inch round cake pans and line with circles of parchment paper, then butter parchment. (Alternately, you can use a cooking spray, either with just butter or butter and flour to speed this process up.)

Sift together flour, baking powder, baking soda, and salt in a medium bowl. In a large mixing bowl, beat butter and sugar in a large bowl with an electric mixer at medium speed until pale and fluffy, then beat in vanilla. Add eggs 1 at a time, beating well and scraping down the bowl after each addition. At low speed, beat in buttermilk until just combined (mixture will look curdled). Add flour mixture in three batches, mixing until each addition is just Incorporated.

Spread batter evenly in cake pan, then drop the pan on your counter several times to eliminate air bubbles, this step is actually more important than you think.  If you skip it, you'll end up with a cake full of holes, more prone to breaking apart when you go to cut out your hearts. Bake until golden and a wooden pick inserted in center of cake comes out clean, 35 to 40 minutes. Cool in pan on a rack 10 minutes, then run a knife around edge of pan. Invert onto rack and discard parchment, then cool completely, about 1 hour.


After this is done, you have to make the filling. Please don't be scared of the shortening.  It's in WAY more things than you even know about.  Frostings, fillings, pie crusts and most things the are fluffy and sugary and defy gravity have some shortening in them. This comes from topsecretrecipes.com
Filling recipe:
2tsp very hot water
1/4 tsp salt (fine)
2 cups marshmallow cream (one 7 oz jar)
1/2 cup shortening
1/3 cup powdered sugar
1/2 tsp vanilla extract

Combine the salt with the hot water in a small bowl and stir until dissolved, let cool.
Combine this with the marshmallow cream, shortening, powdered sugar, and vanilla and beat well on high until light and fluffy.  This is where you can take some liberties, also.  I added at least another 1/4 cup of sugar because I wanted to be so sweet and as Little Debbie-like as possible.
Add the salt water solution to the rest of the filling and mix.

Next, I sawed each cake horizontally.  So now, instead of three cakes, you have six.  Take your heart cookie cutter and cut as many as you can get out of each cake.  Spread a thin layer of the filling between two heart shapes and place in freezer for maybe 10 minutes.


For the coating:
One to two packages almond bark
Pink or red food coloring

Get your almond bark ready by chopping up into bits and place in microwave safe dish.  Microwave for 30 seconds and then stir, repeating the process until velvety (maybe four times or less).  Set a small bowl of this aside for drizzling later.  Put a few drips of red or pink food coloring into the almond bark and stir.  As you work on coating your cakes, the bark will harden, pop in the microwave for 20 seconds or so.  I only used one package of almond bark, but I strongly recommend using two.  That way you'll be able to dip your cool cakes in it and make a thicker coating.  I just used a knife to spread, but ideally I would set them all out on a cooling rack and pour the bark over the top, spreading down the sides with a spatula. Drizzle with the white almond bark you set aside (I added a bit of purple to mine).  Let cool on the counter or in the freezer to speed up the process.  Enjoy with some milk, champagne, or your favorite 40 oz malt beverage from the gas station!